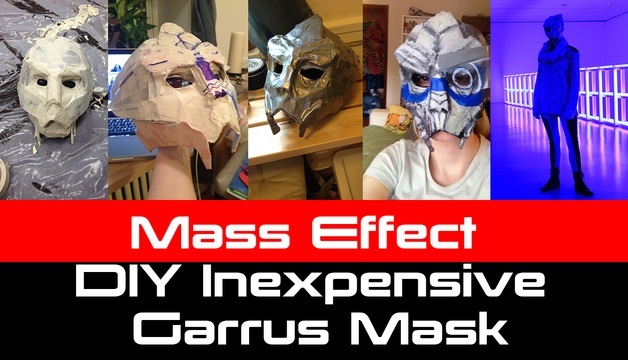
Garrus is one of the most beloved characters in the Mass Effect franchise. Today I’m going to walk you through the steps I took to create my own Garrus Cosplay Mask.
While this may not be the most efficient or best way to make a mask, I’ve found that it’s probably the cheapest method to make a mask as complex as this one.
Supplies you will need:
- A masquerade mask that fits your face(I used this one, though it is small)
- 1-2 rolls of Duct Tape / Masking tape
- Foam sheets or cardboard
- Gesso
- Sponges/ fine art brushes or small paint brushes
- Sandpaper optional
- Acrylic Paint
- UV contacts or Sclera contacts
- Velcro
Step 1: Make sure the base mask fits
Check to see how the masquerade mask fits your face. You may need to make guidelines to make the eyes bigger. With a marker, draw guidelines for where you want to cut the mask.
Step 2: Cut out the basic face shapes
You now want to take your foam sheets or cardboard and cut out the basic shapes of Garrus’ face. He has a rectangle nose, triangular brow pieces, a triangle forehead, L-shape mandibles, and five spikey pieces on the back of his head.
Keep in mind that three of those pieces should be much longer than the other two. You can find fairly nice templates; I wished that I had known about these one when I started. Step 3: Cover face features with tape
Once you have cut out the pieces, you want to cover those pieces in 2-3 layers of tape. You can use masking tape or duct tape. Either will work fine. Once you’ve wrapped a few layers around each piece you’ll notice that when you bend the piece it will keep it’s shape.
 Step 4: Attach and add more tape
One piece at a time you want to tape it to the mask. You also want to cover the mask in many layers of tape, to bulk it up and create one solid piece. This is not a quick process, this is going to take a great deal of time and many layers of tape. While you are building up layers be sure to test the mask out on your own face to make sure everything is fairly symmetrical.
Step 5: Cover tape lines with Gesso
Once you have the mask put together. You want to paint on a couple layers of Gesso primer which you can find at a craft store or amazon. Your goal here is to cover up the tape lines. Note: You can try to use plaster if you want, but I found it messy, and very flakey.
Over the tape, paint on the Gesso in thin layers, being absolutely sure to cover the entire outside of the mask. It takes approximately a half an hour for the each layer to dry. I did about 6 layers, however, I’d recommend that you add more layers.
Step 6: Paint a basecoat
The Gesso primer dries white, so now it’s time to mix grey acrylic paint with some of the Gesso to create a basecoat. You want to, as best you can, match the grey mixture to Garrus’s skin tone. Be sure to cover the entire outer mask. I put down two layers of the mixture before I moved on to the rest of the painting.
Step 7: Use sandpaper to get the texture you want
What’s nice about using tape for thisproject is that you left with a bumpy texture to paint on, which is very similar to the rocky texture of Garrus’s skin. You can use sandpaper to play up the texture a bit more, but I didn’t find that necessary.
Step 8: Paint! Pay attention to contours
Painting is hard. Make sure you have a couple reference images at all times when you are painting. Those of you who are used to putting on makeup, this process may be a bit easier for you. Basically, you want to contour and highlight the mask. On a reference image consider where the natural shadows and highlights are on Garrus’s face.
With your grey paint mixture as a base create a few different shades by adding white and black. I used about 6 different shades of grey to paint the entire mask. Remember, if you make a mistake, let it dry completely and then paint over it.
Step 9: Add scars
One side of Garrus’s face is cover in scars. Using a hot glue gun you can create the raised, bumpy texture of his scars by making fairly random zig zag patterns and letting it cool. Paint over this with a deep cool-toned red color.
Step 10: Seal the paint
One you are happy with the paint job, seal it all in with a clear matte spray paint. Make sure you do this outside or in a well-ventilated area.
Step 11: Add a velcro strap
Using velcro create a strap that you can use to afix the mask to your face.
Step 12: Final touches
To make the mask really come together I would purchase a pair of Sclera or UV contact lens. Though I haven’t tried this particular pair before, they do seem the most like Garrus’s eyes.
They are expensive, but the UV contacts should be less so. Be sure to follow all safety instructions when wearing contacts!
Step 13: Enjoy!
Enjoy being Garrus, you space kitties.




Published: Jun 12, 2015 08:50 am