Some Minecraft players have run into an issue where they can’t update their Minecraft Realms servers to the current 1.19 version of the game.
Our guide will explain how to update Minecraft Realms to 1.19 version. This process is a little tricky, but actually very simple when you have your base game fully updated.
Minecraft: How to Update Realms to 1.19

Minecraft Realms service does not require any additional updates except the base game, which has a default setting for automatic updates.
However, some players may have turned this option off. If you have done so, then you need to manually update Minecraft to 1.19 version, which will automatically update the Minecraft Realms servers that you’ve been using or managing prior to the update.
Here’s what you need to do in order to manually update your Minecraft game to 1.19 version:
- Start Minecraft Launcher app.
- Go to “Installations” tab in the top menu.
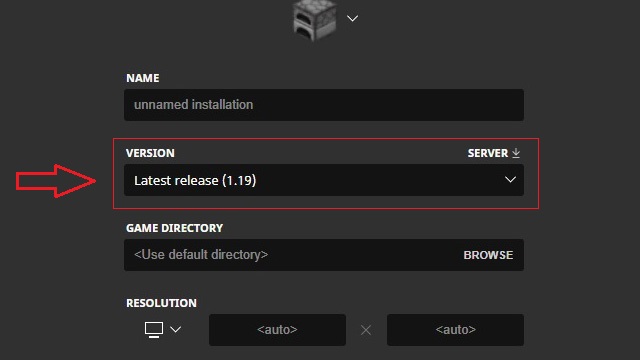
- Select “New Installation” option.
- Click on the “Version Server” feature.
- Select “Latest Release (1.19)” option.
- Press “CREATE” button in the bottom right corner.
- Go back to the main menu and press “PLAY“.
The downloading and updating of your Minecraft game will start at this point. Wait for it to complete and the game should begin with a new updated 1.19 version. You can see the version of Minecraft at the bottom left corner at the start of the game.
If you’ve done everything right, then your Minecraft Realms server should also be updated to the latest version.
Related guides
- Minecraft: How to Make a Recovery Compass
- Minecraft: Mud Brick Crafting Guide
- Minecraft 1.19 Ancient City Survival Guide
- How to Play Minecraft 1.19 Wild Update Early
- Minecraft Emerald Tycoon Guide
That’s all you need to know on how to update Minecraft Realms to 1.19. Be sure to check out the rest of the Minecraft tips and tricks articles on our dedicated hub page.


Published: Jun 15, 2022 08:01 am