The Dentist serial killer case is a big wall for many This Is the Police players. Not because they can’t progress the game without solving it but because of the compulsion to finish it capture the culprit. It just doesn’t feel right not to take him down.
The Dentist investigation is a long one. You get postcards from the Dentist himself, from which you need to discern clues from to figure out where he’s stashed the next piece of evidence. You have one day to do it, and once you do you wait a few days for the next postcard and repeat the process for a total of 15 frames.
This guide is first going to tell you the locations you need to check for evidence, then will tell you the correct order of frames for the solution at the end of the investigation.
The snitch officer
One thing to note is that you need to deal with whatever officer is threatening to take your evidence to the FBI. Remember: If the FBI takes over the investigation the Dentist will go free.
You’ll only have one officer threatening to give up the evidence and it happens relatively early in the investigation. You can fire them or you can have either Sands or Vargas (depending on which you sided with) take them out for a meager sum.
If you choose to have them killed, bear in mind that the mafia sets up the crime trap the day after you arrange for it to be done. Speak with the mafia the day before the snitch will be in for work.
Collecting evidence
Each postcard the Dentist sends you is meant to point you in the direction of the next piece of evidence. The postcard clues are a little obtuse but make sense if you may more attention to the images’ details rather than their setting.
Each piece of evidence you collect will be used after you have all of them in your possession. This guide does not include evidence images and only provides answers to reach the end of this investigation.
Card #1
 The correct location to investigate is Holy House Pizza.
Card #2
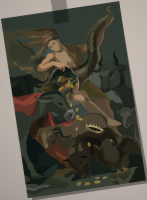 The correct location to investigate is Fortune Bank.
Card #3
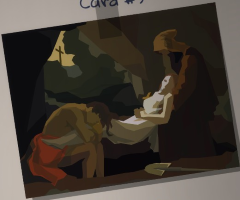 The correct location to investigate is the funeral home. (Forgot the actual name.)
Card #4
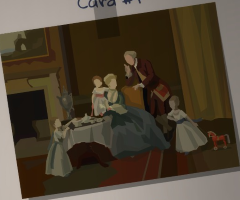 The correct location to investigate is Wooden Horse Toy Store.
Card #5
 The correct location to investigate is Gorgon Hair Salon. (I believe that’s the name.)
Reconstructing the Dentist’s MO
It’s time to reconstruct the Dentist’s MO if you’ve collected all the evidence and gotten this far. This is one of the many instances where the game makes no qualms about putting you in a situation you can’t get out of — if you choose the wrong frames before you go into the reconstruction phase, you’re locked out of solving the case unless you exit to main menu and load a previous date to do it again.
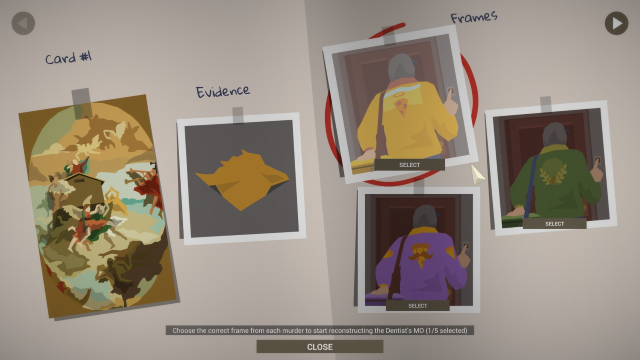
You have to figure out which frame out of three, per card, is the correct one based off the evidence you have collected. The frames you choose should be purely based off the evidence and is not hinted at by the cards in any way.
Card #1 correct frame
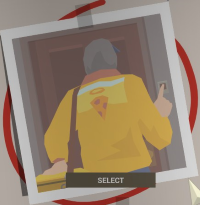
The yellow fabric evidence points to the murderer wearing the yellow-orange holy pizza jacket.
Card #2 correct frame
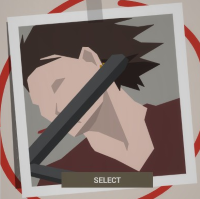
The police car toy evidence points to the nightstick, a common weapon for police officers, being the murder weapon.
Card #3 correct frame
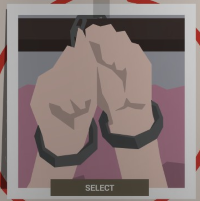
The Bible you got as evidence is adorned with chains, pointing to chains being the Dentist’s chosen restraints.
Card #4 correct frame
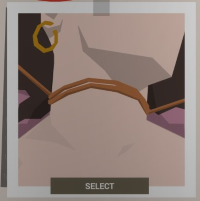
The latex gloves you found as evidence may make you think to choose the card with the gloves, but the Dentist would need to wear latex gloves to pull the rope around the victims’ necks without hurting his hands.
Card #5 correct frame
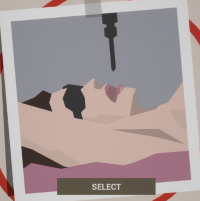
The note you collected as evidence for card 5 tells you that you’ve found everything you need — this is the only frame that fits the bill.
The sequence
Once you’ve chosen all five of the frames above, click “Open Sequence” and get ready to put them together based on the information given.
The sequence is actually in the same order as the cards. But for a recap, here’s it written out:
- The Dentist poses as a pizza guy from Holy Pizza House
- He knocks the victim out using a nightstick
- He then restraints the victim with chains
- The Dentist then strangled the victim to death using rope
- He drills the victim’s teeth after death (the victim is blindfolded)
And with that you’ve solved the case of the Dentist! What happens from here is for you to find out, but now you can take on the Dentist with confidence and information on your side. Do you really think this will stave off your retirement, Mr. Boyd?
If you’re having trouble with some of the game’s other investigations and want some help be sure to check out my in-progress This Is the Police investigations guide, complete with sequence pictures. Even you need help sometimes, Jack.



Published: Aug 19, 2016 10:45 am