Along with weapon mods you use to enhance your swords and hammers in Soulmask, you can also craft mods for your armor. These will help you stay even more protected from enemies or dangerous elements around the world. Here’s how to make them and equip them.
How to Make Armor Mods in Soulmask
To begin crafting armor modifications, you’ll need to unlock them in the Knowledge & Technology menu (T on your keyboard). You can unlock the most basic armor mods in the Medium Craftsmanship tech and the more advanced options in the Advanced Craftsmanship tech.
Once you have those, you’ll have the recipes to start crafting them. However, you’ll also want to ensure you have the right crafting stations. You’ll need the Craftsman’s Bench and the Armor Forging Table to make them all of them. Here’s how to make them using a Building Workshop:
| Crafting Table | Materials |
|---|---|
| Craftsman’s Bench | Rough Leather x5 Leather Rope x5 Hardwood Plank x5 Stone or Flint x24 |
| Armor Forging Table | Plank x19 Leather x10 Thin Rope x10 |
After you place these crafting benches down at your camp, you can interact with them to see all the mod options you can make. You can press the ‘other’ toggle at the top of the crafting list to narrow it down to just the mods.
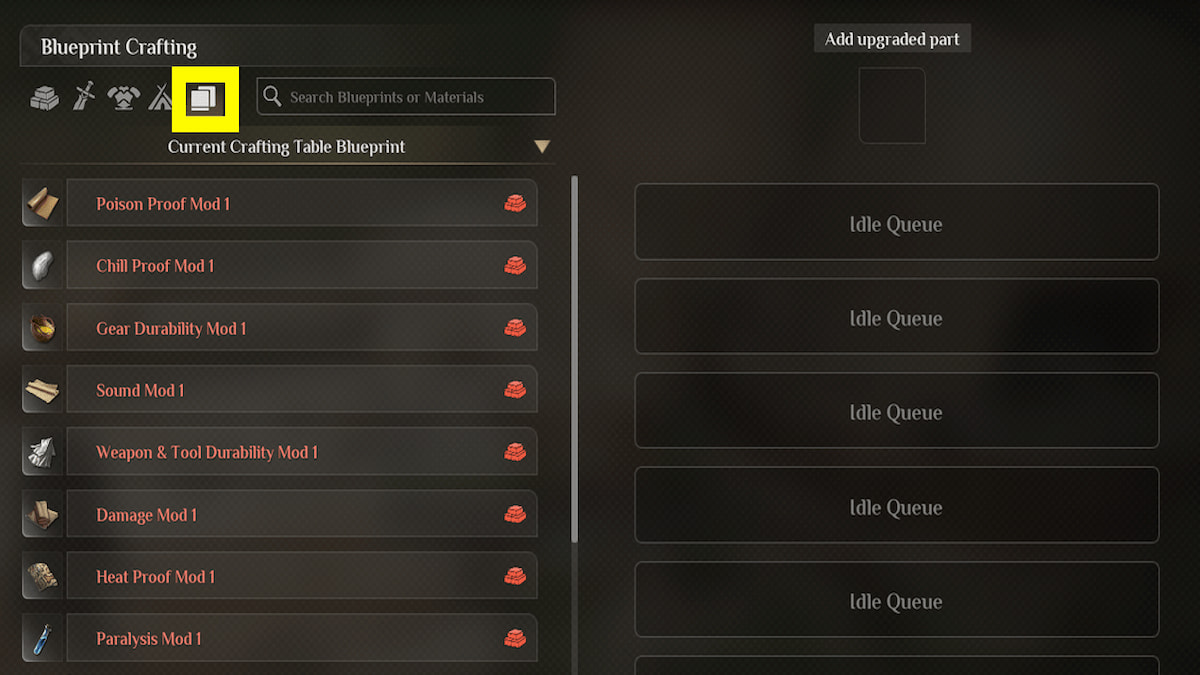
Like always, you’ll need the correct ingredients to make the mods. Most of them will require some form of cotton, leather, hides, oils, etc. You’ll want to make sure you have the other crafting benches you need for this, like a Loom and a Tanning Rack. Then, you can start collecting all the items you need.
All Armor Mod Crafting Recipes
All the armor mods are helpful in their own way, providing extra defense or resistance to extreme temperatures or poisons. However, if you’re looking for the very best of armor mods to use, I would recommend the following:
- Damage Reduction Mod 2
- Defense Mod 3
- Gear Durability Mod 2
These are the best mods because they will provide you with the most base protection and keep your gear from breaking a lot longer than the others. They are also the most advanced of the mods, so if you don’t have the means to craft them yet, start from the lesser ones and work your way up.
Here’s how you can make all of them:
| Armor Mod | How to Make | Stats | Where to Make |
|---|---|---|---|
| Gear Durability Mod 1 | Raw Lacquer x2 Resin x5 | Durability Cost Speed Down: 20% | Craftsman’s Bench |
| Chill Proof Mod 1 | Yarn x2 Coarse Cotton x1 Beast Fuzz or Feather x4 | Chill-Proof: 3 | Craftsman’s Bench |
| Heat Proof Mod 1 | Anaconda Skin x1 Yarn x2 Coarse Cotton x1 | Heat-Proof: 5 | Craftsman’s Bench |
| Poison Proof Mod 1 | Coarse Cotton x2 Cooking Oil or Mineral Oil x2 | Poison-Proof: 5% | Craftsman’s Bench |
| Sound Mod 1 | Fiber x5 Yarn x2 | Sound Coefficient: -3% | Craftsman’s Bench |
| Concealment Mod 1 | Clay x2 Fire Ash x2 | Concealment: 3 | Craftsman’s Bench |
| Defense Mod 1 | Copper Wire x10 Raw Lacquer or Mineral Oil x2 | DEF: 10 Movement SPD: -2% Sound Coefficient: 5% Gear Weight: 200% | Lv.1 Armor Forging. Table |
| Gear Durability Mod 2 | Mineral Oil x2 Resin x5 | Durability Cost Speed Down: 40% | Craftsman’s Bench |
| Chill Proof Mod 2 | Premium Feather x4 Yarn x2 Fine Cotton x1 | Chill-Proof: 6 | Craftsman’s Bench |
| Heat Proof Mod 2 | Asbestos x1 Yarn x2 Coarse Cotton x1 | Heat-Proof: 10 | Craftsman’s Bench |
| Poison Proof Mod 2 | Rubber x2 Fine Cotton x2 | Poison-Proof: 10% | Craftsman’s Bench |
| Sound Mod 2 | Yarn x2 Pelt x2 Premium Pelt x2 Delicate Pelt x2 | Sound Coefficient: -6% | Craftsman’s Bench |
| Concealment Mod 2 | Red Paint x5 Green Paint x5 Blue Paint x5 | Concealment: 6 | Craftsman’s Bench |
| Radiation Proof Mod 1 | Tin Ingot x2 Silver Ingot x2 Bee Wax x2 | Radiation-Proof: 5% | Craftsman’s Bench |
| Radiation Proof Mod 2 | Rubber x5 Silver Ingot x5 Mineral Oil x2 Bee Wax x2 | Radiation-Proof: 10% | Craftsman’s Bench |
| Defense Mod 2 | Iron Wire x10 Raw Lacquer x2 Mineral Oil x2 | DEF: 20 Movement SPD: -2% Sound Coefficient: 5% Gear Weight: 200% | Lv.2 Armor Forging Table |
| Damage Reduction Mod 1 | Iron Ingot x10 Rubber x5 | DMG Reduction: 2.5% Movement SPD: -2% Chill-Proof: -2 Heat-Proof: -2 | Lv.2 Armor Forging Table |
| Defense Mod 3 | Steel Wire x10 Raw Lacquer x3 Mineral Oil x3 | DEF: 30 Movement SPD: -2% Sound Coefficient: -5% Gear Weight: 200% | Lv.3 Armor Forging Table |
| Damage Reduction Mod 2 | Steel Ingot x10 Rubber x5 | DMG Reduction: 5% Movement SPD: -2% Chill-Proof: -2 Heat-Proof:-2 | Lv.3 Armor Forging Table |
How to Equip Armor Mods
Once you have your armor mods made, you can start applying them to your armor. All you need to do is find it in your inventory and then drag it onto the armor you want it to apply to.
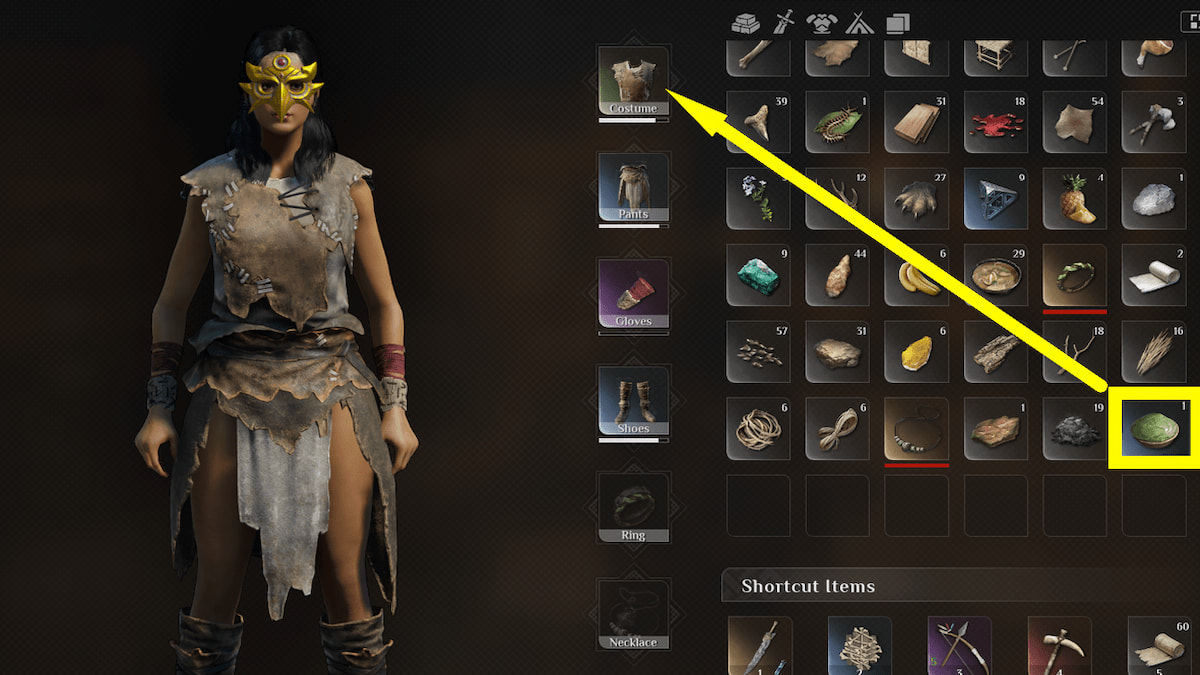
When it’s applied, you’ll see the icon on top of your armor icon in your inventory. Just like weapon mods, they don’t last forever. If your armor breaks or you repair the armor, the mod will be removed. You can also only have one mod on it at a time. Once you place the mod, you can’t remove it. If you want to replace it, you can drag a different mod on top of it.
Modding your armor is a great way to stay better protected while you explore the dangerous world. Try to stay stocked up on them so you can keep applying them as much as possible. You can even switch them out to suit your playstyle, concealment for sneaking and hunting, or full defense for raiding a dungeon or barracks. They will help a lot!
Want more tips like this? Check out GameSkinny’s Soulmask guides hub.




Published: Jun 14, 2024 11:34 am