The issue of filling up your PlayStation hard drive too fast is a common worry among gamers – especially with the upcoming release of the 1TB version of PlayStation as opposed to the current 500GB, which has trouble holding all the chunky updates and large-data games.
You want a nice, big, 1TB+ PlayStation 4, right? Well, here’s how. Make note: this is only applicable if you already have a PS4 with the old 500GB. It just saves the hassle of buying a new 1TB, or if you want to buy a cheaper 500GB PS4 and simply upgrade the hard drive later.
Sound good? Here’s how to do it:
Tools

Before you can replace, you must buy a new hard drive. There are three major requirements to be compatible with the PlayStation 4 software:
- Must be 2.5″ internal hard drive, no taller than 9.5mm
- Must be at least 160GB (If you’re reading this, you’re getting over 500GB, so that’s not a problem)
- Must be a Serial ATA drive
Compatible Drives
Regular Hard Drive
- Pros: Cheaper ($50-$75), Slightly Faster, comes in 1TB
- Cons: Only slightly faster
Solid State Drive
- Pros: Faster
- Cons: Pricy ($200-$400), smaller space options
Solid State Hybrid Drive
- Pros: NAND Memory, Improved speeds, available in 1TB
- Cons: NAND Memory, Slower initial game loads, a bit more costly than regular hard drives
Other Tools

A few other things you’ll need are as follows:
- Small Philips-head screwdriver
- 1GB USB Flash Drive (at least 1GB)
- Replacement hard drive
- Computer with internet
- Micro-USB cord to re-sync controller
One thing worth mentioning is that you should make sure your flash drive fits in the PS4 slots. Sometimes they’re not skinny enough.
Replace the Hard Drive
This can be described in 5 simple steps, but each step has mini-tasks required of it within each step. They’ve been divided accordingly for easier reading:
Download System Software
- Plug into your computer and create 2 folders: PS4, and then inside PS4 create a folder titled UPDATE. All capital letters so the PlayStation can read it later.
- Download software from Sony’s website and put PS4UPDATE.PUP inside the UPDATE folder
Backup Your Game Saves (if you have any)
- In your PS4, go to: Settings > Application Saved Data Management > Saved Data in System Storage
- Either choose to upload to cloud, or upload to the flash drive. Copy.
- If you want to do a complete system back-up instead (to keep videos or screenshots) go to System > Back Up and Restore.
Replace the Hard Drive

- Turn off & unplug PS4
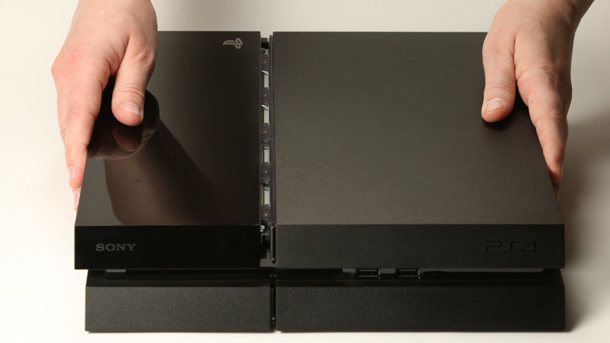
- On the shiny left side: press and slide left.
- Bottom left corner: Unscrew the screw with 4 PlayStation button symbols.
- Slide out the hard drive. Unscrew the 4 screws on the sides of the tray to release hard drive.
- Replace it with the new hard drive, lining up connectors to face the same way as the original.
- Replace side screws, slide in the drive tray, replace the PlayStation screw.
- Slide on the cover and snap it into place. Tada!

Install Software to the new hard drive
- Plug in PS4, insert USB flash drive, turn on. (It will turn on in Safe Mode. If not, press and hold the power button when turning it on for a second beep that means it’s in Safe Mode)
- Re-sync controller with micro-USB cord.
- Select “Initialize PS4 (Reinstall System Software)” and receive a “Please Wait.”
- When it appears, confirm by selecting “Yes.” It may take a while for this message.
Restore Saves (If you need to)
- Go to Settings > Application Save Data Management.
- Select either USB or Cloud storage (whichever you used)
- Select Copy to System Storage
- If you did a full system back-up, go to System > Back Up and Restore. Follow prompts.

You did it! Revel in your new (probably 1TB) hard drive. Download all the future updates! Get all the big games! Maybe tell your friends you got a 1TB before release and confuse them as they marvel at your glory!
If you’d like to see the extended version with more photos for places where you may have gotten stuck, you can check it out here.


Published: Oct 20, 2015 02:34 pm