Like any good roleplaying game, you’re going to find plenty of depth in Octopath Traveler. As you venture further into the game you’re going to want to give your characters a wider range of abilities and skills to use in combat. One way to do this is by giving them secondary job classes.
However, in order to unlock these jobs, you need to locate their shrines. The shrine locations are scattered throughout Orsterra and you need to find them. While you may discover them during your playthrough, this guide will break down details about their locations to make locating them easier.
This guide will also list the four advanced job class shrines hidden in the world, each protected by a formidable foe. All of the areas you’re going to travel through to these shrines are infested with monsters prepared to take on a party of Level 20 characters.
Related Content:
Shrine of the Flamebearer (Cleric)
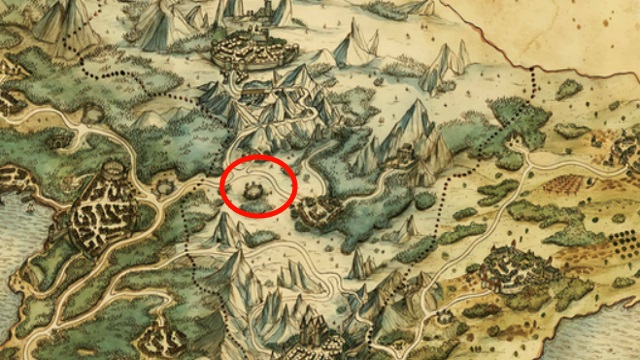
You’ll find the Shrine of the Flamebearer located in the Frostlands, in the northern part of the map on the Western Stillsnow Wilds path. When you’re on this road, find the signpost on the eastern part of the area. Once there, head south and you should find yourself going up a small hill and then going down it. At the bottom of the hill, go to the left and you should see small rocks poking out the snow. Continue until you see a small torch outside a cave, which is the entrance for the shrine.
Shrine of the Prince of Thieves (Thief)
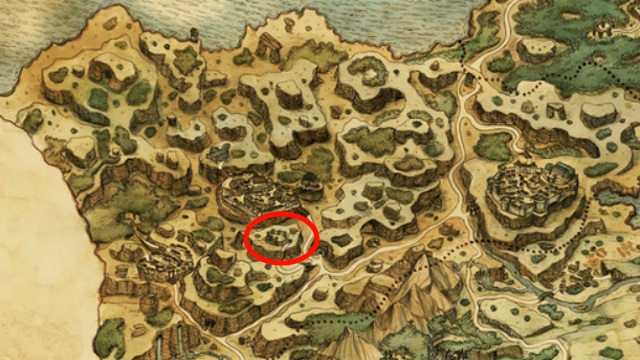
The Shrine of the Prince of Thieves is located in the Cliftlands, the western most region on the South Quarrycrest Pass. You’ll find this shrine on the left side of the map. When you’re leaving the city Quarrycrest, follow the path out of the city and continue going left and stop right before the second bridge. Instead of crossing it, proceed to the left and go down a small pathway. This should take you under the bridge, to the entrance of the shrine.
Shrine of the Lady of Grace (Dancer)
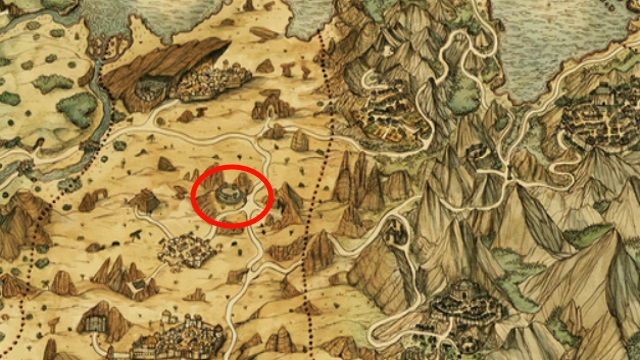
The Shrine of the Lady of Grace is located in the Sunlands, the southern most region of Orsterra on the road called the Northern Wellspring Sands. Start at this area’s signpost just outside of Wellspring and go up. Proceed to the left, past the guard, and go up until you see a red flag. Do not continue forward. Go to the left and you should find the entrance to the shrine underneath a small stream of running water.
Shrine of the Sage (Scholar)
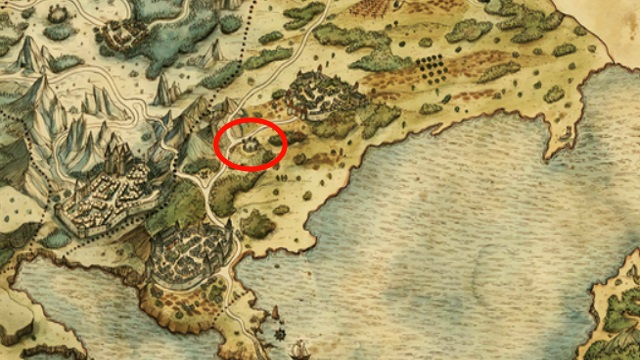
You will find the Shrine of the Sage in the Flatlands, the region located at the northwestern section of the map on the Western Noblecourt Flats. It’s right outside the city of Noblecourt. When you leave the city, go left on the path a short distance before going down the through a field of grass. This will take your party up a small hill, and you should veer them slightly to the left as they continue. Adjust your party’s direction to the right once you pass a character standing next to several rocks. You’ll find the shrine’s entrance carved into the side of a rocky hill.
Shrine of the Trader (Merchant)
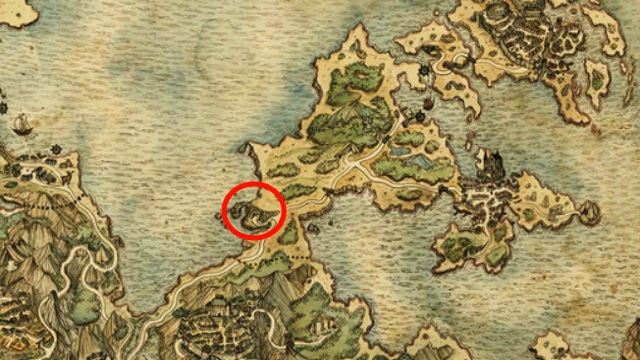
Let’s go to the east! The next shrine is the Shrine of the Trader located in the Coastlands, the region set furthest to the east on the Moonstruck coast path. When you arrive in Moonstruck Coast coming from West Goldshore Coast proceed southwest for all of your journey. Eventually, your path will force you to only go west until you arrive to a dead end. Go up to the rock wall and press your characters against it, taking a sharp right. This will take you into the Shrine of the Trader.
You should be careful around this area as the creatures here are prepared to fight level 30 characters.
Shrine of the Huntress (Hunter)
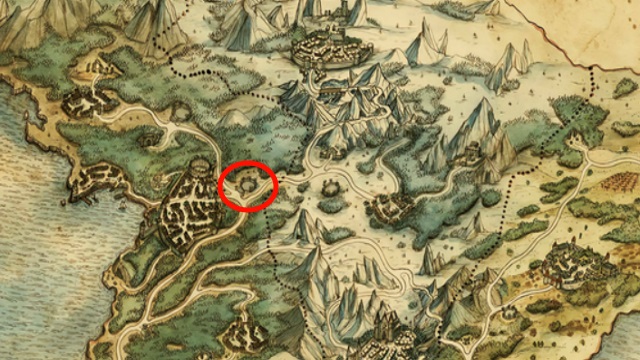
The Shrine of the Huntress is located in the Woodlands, the top left region of the map on the East Victors Hollow Trail. When you’re at the signpost proceed north to Victors Hollow. Follow the path and stop when the path forces you to go to the left. Instead of continuing to follow the path go to the right into the forest. You’ll find the cave entrance for the Shrine of the Huntress shortly after.
Shrine of the Thunderblade (Warrior)
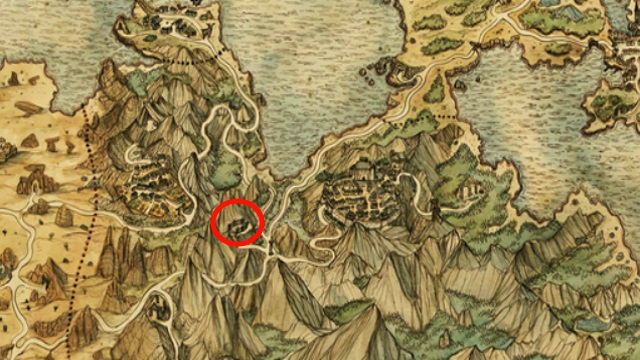
Time to get your leg day in. The Shrine of the Thunderblade is located in the Highlands, the region on the bottom right of the map on the North Stonegard Pass. When you’re at the signpost of this area, go to the left and follow the path. Eventually, you should see a small flag on top of a rock blowing in the wind. Instead of following the path up, go to the left, which should take you down a small slope. The entrance to the shrine is at the bottom of the slope.
Shrine of the Healer (Apothecary)
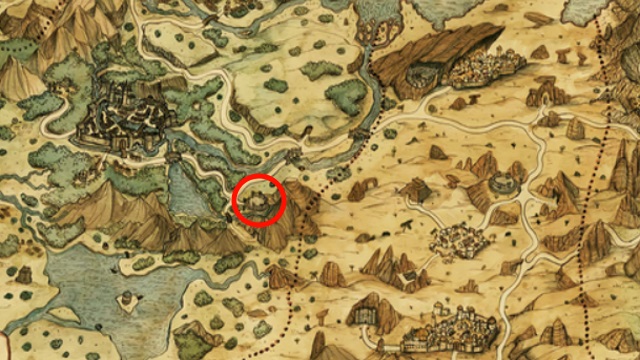
The final one! To find the Shrine of the Healer go to the Riverlands, the southern region between Cliftlands and the Sunlands, and go to the area called East Saintsbridge Traverse. When at this location’s signpost, you’ll find you’re in the middle of a crossroad. Take to the right path and proceed down it. The path should take you directly cave of the Shrine of the Healer.
Advanced Job Class Shrines
You’ll want to make your way these shrines later in the game. Unlike the eight other shrines, you must face a boss in order to gain access to these areas. Make sure you’re ready to face them! These foes do not go easy on your party and are best taken on after you reach chapter 4.
Shrine of the Runeblade (Runelord)
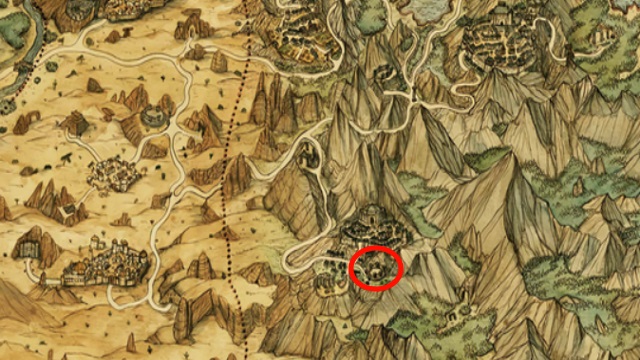
The Shrine of the Runelord is located in the Highlands, in the same region you located the Shrine of the Thunderblade on the West Everhold Pass. When you’re at this area’s signpost, proceed to the right and follow the path. Stop once you’ve arrived at the fork in the road, and proceed to the right and then down. You’ll follow an unmarked pass and eventually make it to the cave entrance for the Shrine of the Runelord’s.
Shrine of the Archmagus (Sorcerer)
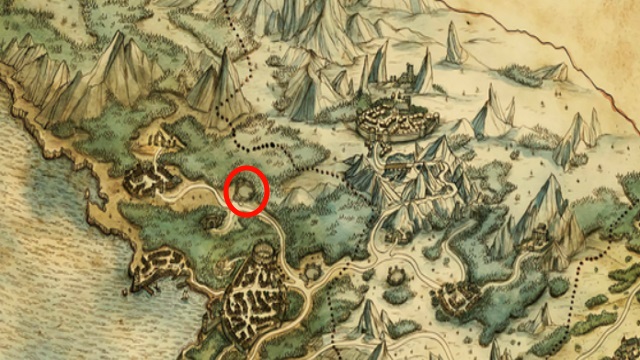
Time to return to the north for the Shrine of the Archmagus! You’ll need to travel to the Woodlands, this is the same region you found the Shrine of the Huntress and you need to be on the East Duskbarrow Trail. When you’re traveling from Duskbarrow on the path, follow it all the way, past the signpost, until you arrive to the entrance of an unmarked path shrouded in mist. This path should have you go upwards on the map. Follow it all the way, and at the end you will arrive to the Shrine of the Archmagus.
Shrine of the Warbringer (Warmaster)
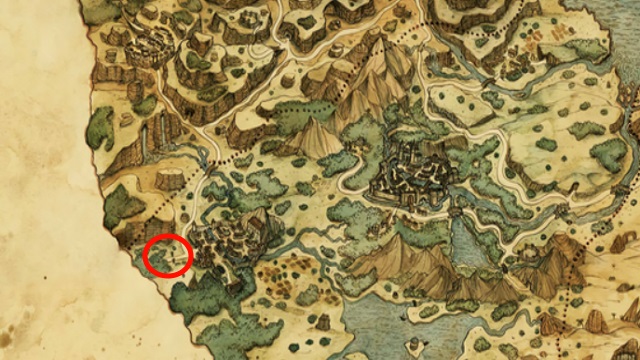
We’re nearly done! The Shrine of the Warbringer is located in the Riverlands, the same region you found the Shrine of the Healer on the North Riverford Traverse path. When you arrive to this area’s signpost, just outside of Riverford, follow the path left. Stop right before you arrive to the small stone bridge. Instead of going up, continue to the left. You should follow an unmarked path to the left, and then down, a short distance before you find yourself at the cave entrance to the shrine.
Shrine of the Starseer (Starseer)

The last one! The Shrine of the Starseer is located in the Flatlands, it’s in the same region you discovered the Shrine of the Sage on the Western Wispermill Flats side. When you’re leaving the city of Wispermill, proceed down the path to the left, but only for a short distance. Stop immediately after the cut down trees and go upwards, towards the cow farm, and then to the right. You’ll find your view blocked by the rocks, but if you continue forward into the rocks you should find your party entering the shrine.
—
This covers all of the shrines found throughout the Octopath Traveler! For more tips and tricks, check out our other Octopath Traveler guides.



Published: Jul 16, 2018 12:09 pm