Project Zomboid zombie spawns and more can be adjusted with customizable sandbox settings. This allows players to tailor the game to their own playstyle to optimize their individual experiences. In this guide, we’re going to break down all of the available sandbox settings in Project Zomboid.
How to Adjust Zombie Spawns in Project Zomboid
From the main menu, click Solo, then under Playstyle, select Custom Sandbox to be brought to the settings page.
You’re going to find 11 pages worth of options, though only the first and last relate to zombie spawns. You can feel free to explore the nine other pages and mess around with loot rarity, gas rarity, time advancement, etc.
Project Zomboid Population Settings
The first page of options, Population, has just two dropdowns: Zombie Count and Zombie Distribution. These two settings are quite intuitive.
Zombie Count will define the number of zombies you have in your game. By default, it is set to Normal, but you can increase of decrease this as you please, ranging from Insane to None.
Zombie Distribution has two options: Urban Focused and Uniform. Urban Focused is the default option, and this just means that you will see more zombies in urban areas, as you would expect in an apocalypse. If you switch this to Uniform, the zombies will become evenly distributed throughout the world.
Project Zomboid Advanced Zombie Options
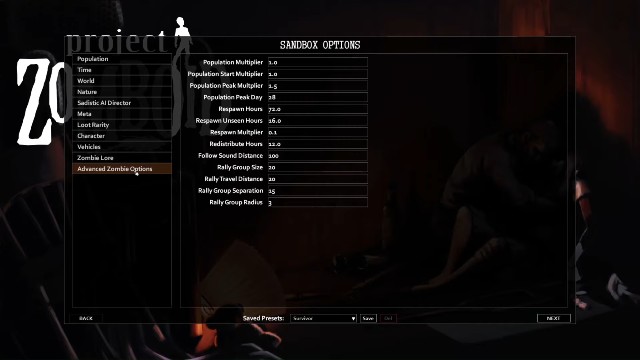
The final page of settings, Advanced Zombie Options, is where the real magic happens. There are 13 options on this page, and this is where most confusions tend to arise for Project Zomboid players. We’ll break them down here.
- Population Multiplier — This option is tethered to the Zombie Count option on the Population page, but can be manually adjusted to more specific values here. The higher the number, the more zombies you will see spawn. Values range from 0 (None) to 4 (Insane), and you can use decimals if you choose. This multiplier works in conjunction with the next two settings, Population Start Multiplier and Population Peak Multiplier.
- Population Start Multiplier — This is how you set the number of zombies you want to start off with in the early game. Just like the previous setting, the higher the number, the more zombies that will spawn. Whatever number you choose (up to 4), that number will be multiplied by the Population Multiplier to set the actual spawn rate.
- For example, if your Population Multiplier is 2.0 and your Population Start Multiplier is 0.1, you will begin with a spawning multiplier of 0.2.
- Population Peak Multiplier — The spawn multiplier increases from the lower bound (the Start Multiplier) to the upper bound (Peak Multiplier, up to 4) over the course of the game. This value is what you want your end-game spawn multiplier to be, again being multiplied by your Population Multiplier.
- Population Peak Day — This is the number of days it will take for the spawn multiplier to linearly increase from the Start Multiplier to the Peak Multiplier. By default, this is set to 28 days, but you can decrease or increase it to anywhere between one and 365 days.
- Respawn Hours — Respawn Hours are the number of hours that need to pass before zombies can respawn in a seen chunk. If you set this to zero, then respawning is disabled, meaning you will be able to clear out an area without needing to worry about zombies respawning in it, though it’s still possible for them to wander into it.
- By default, this is set to three days (72 hours), but it can be increased up to a year (8760 hours). Zombies will respawn in the same cell they died in, but will typically spawn in the outskirts of it.
- Respawn Unseen Hours — This is similar to the last option, and has the same maximum and minimum, though this applies to respawns only in unseen chunks. Say you set this to 72 hours. This means that you would have to vacate an area for 72 hours before zombies can start respawning there.
- This value will always override the value of Respawn Hours for unseen chunks. By default, this is set to 16 hours.
- Respawn Multiplier — This ties in to the Respawn Hours and Respawn Unseen Hours values, and represents the fraction of total zombies that can respawn per set number of hours. If you set this to the maximum, 1.0, then all zombies will respawn every set number of respawn hours. If it is set to 0.1, then it will take ten cycles of the respawn hours for them all to respawn.
There are other settings in the Advanced Zombie Settings page that can be altered, allowing to change the size of hordes that form, group separation distances, how far they will travel and can hear, among other things, though none of these relate to Project Zomboid spawn behavior.
Hopefully, this has answered whatever questions you have about adjusting zombie spawns in Project Zomboid, and now you can adjust your sandbox settings to fit your playstyle. If you’re sick of cleaning up blood around your house and want less zombies, then go ahead and make those changes. But if that’s your thing, go nuts and ramp up the difficulty.
If you’re interested in learning more about Project Zomboid, consider checking out our Project Zomboid guides!



Published: Jan 17, 2022 11:15 pm