It wouldn’t be a Mario adventure without plenty of invisible secrets waiting to be found with a perfectly placed jump. In this guide, I’ll show you where to find all Hidden Treasure Chests in Super Mario RPG.
How to Find All Hidden Treasure Locations in Super Mario RPG
While retrieving star pieces from the clutches of Smithy’s underlings, you can find secret floating treasure chests hidden around Mario’s world. Super Mario RPG has 40 total Hidden Treasures to find. Most take two jumps. First, you’ll need to jump into them from the right spot to reveal them. Then, you’ll jump up again to claim their items. Their treasures include the following items:
- Flower
- Frog Coin
- Croaka Cola
- Red Essence
- Rock Candy
- Goodie Bag
- Mushroom
I highly recommend equipping the best treasure-hunting accessory in the game: the Signal Ring. It notifies you every time you enter a room with a Hidden Treasure nearby; you’ll see the “signal” in the upper-right corner of your screen. I got this early on and actually used it on Mario for my entire playthrough. However, the ones where you have to jump on a character or another chest were still tricky to find.
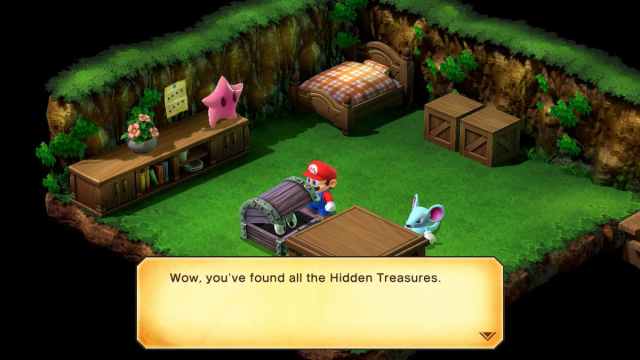
Simply head to the downstairs level of the Mushroom Kingdom item shop and talk to the Toad to get the ring. When you reach Nimbus Land later on, you can get the upgraded Echo Signal Ring, which pings the exact locations of Hidden Treasures. To keep track of your progress, talk to the treasure chest in Monstro Town, and it’ll tell you how many you’re missing.
Where to Find All Hidden Treasures in Super Mario RPG
Here’s a quick breakdown of all 15 regions where you can find Hidden Treasures:
- Mushroom Kingdom
- Bandit’s Way
- Rose Town
- Forest Maze
- Pipe Vault
- Yo’ster Isle
- Booster Pass
- Booster Tower
- Marrymore
- Sunken Ship
- Land’s End
- Monstro Town
- Bean Valley
- Nimbus Land
- Weapon World
Mushroom Kingdom Hidden Treasure Locations
- Number of Treasures: Three
- Rewards: Frog Coin and two Flowers
Mushroom Kingdom Hidden Treasure #1
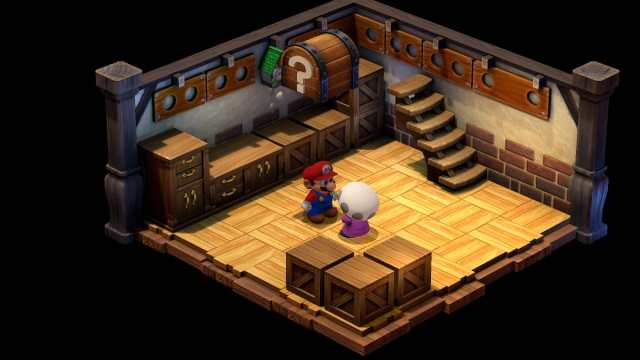
The first hidden treasure I found was in the downstairs level of the Mushroom Kingdom item shop. The Toad tells you to stand before him and then jump, revealing the invisible chest. You’ll receive a Flower and the Signal Ring accessory to equip.
Mushroom Kingdom Hidden Treasure #2
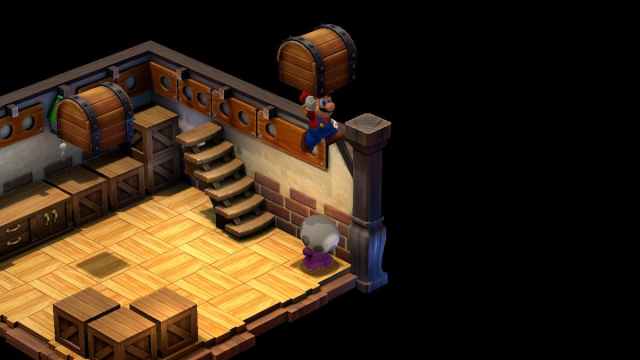
After equipping the ring, it signalled that another hidden treasure was in the same room. To find it, wait until Toad walks to the corner near the stairs. Jump onto his head and jump again to find the chest. You’ll receive another Flower.
Mushroom Kingdom Hidden Treasure #3
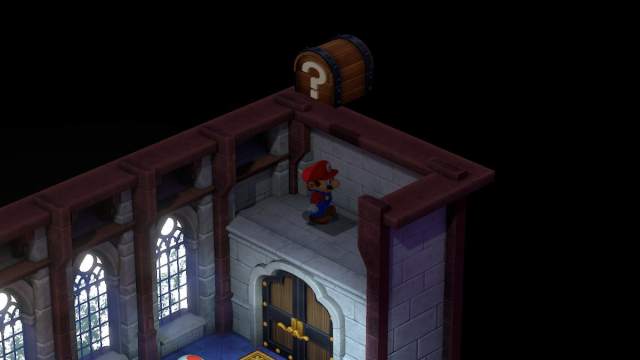
The final treasure chest is located in the foyer of the castle, and it’s a bit tricky to find. You and Mallow need to defeat Claymorton first, after which the Toads will freely walk the halls. Go to the end of the hall with a door and an empty nook at the top, jump on a Toad for a boost up and hit the hidden treasure to get a Frog Coin.
Bandit’s Way Hidden Treasure Location
- Number of Treasures: One
- Rewards: Croaka Cola
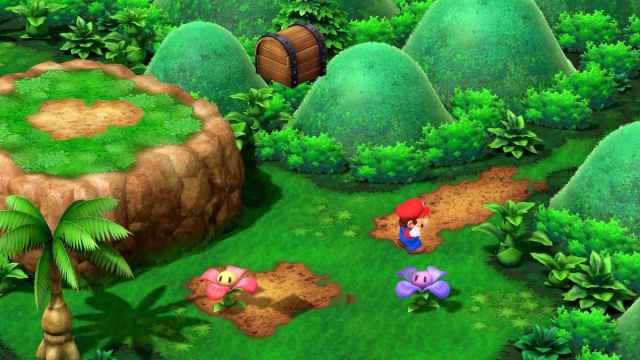
After using the yellow platforms, you’ll come to a space with a red and purple flower. Get on the red flower and time your jump when facing right. You’ll hit the invisible treasure, yielding a Croaka Cola.
Rose Town Hidden Treasure Locations
- Number of Treasures: Two
- Rewards: Two Frog Coins
Rose Town Hidden Treasure #1
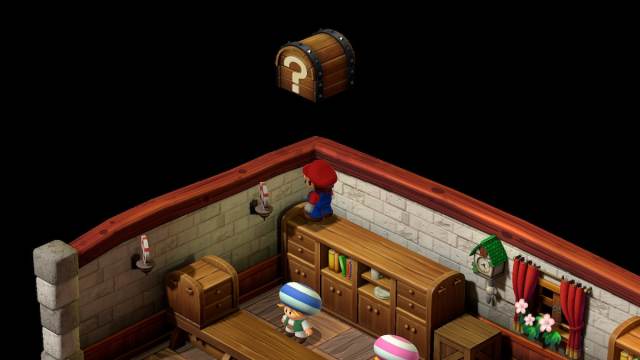
Head to the item shop in Rose Town. Behind the counter, hop up on the cabinets and go to the top-left corner. Jump up to reveal the hidden treasure.
Rose Town Hidden Treasure #2
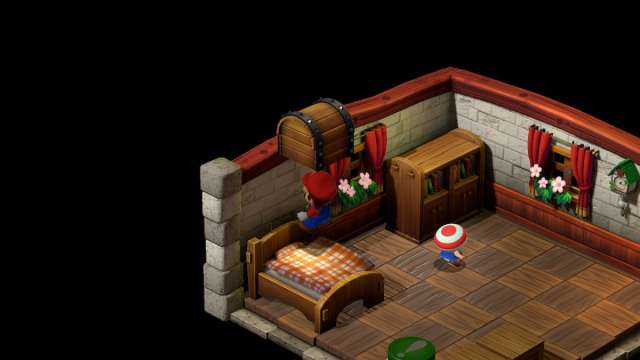
This treasure is easy to miss. First, jump on a Toad outside to reach his house. Go to the upstairs level and jump on the bed next to the green button.
Forest Maze Hidden Treasure Locations
- Number of Treasures: Six
- Rewards: Frog Coin, two Croaka Colas, Flower, Red Essence, and Nothing
Forest Maze Hidden Treasure #1

At the entrance of the Forest Maze, go to the left corner before the pathway and jump up to access a hidden treasure with a Croaka Cola.
Forest Maze Hidden Treasure #2

Once you emerge from the underground, jump to the left of the stump, as shown in the image above. You’ll receive a Frog Coin.
Forest Maze Hidden Treasure #3
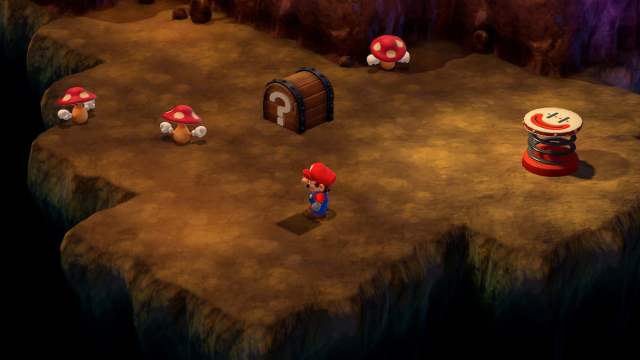
Some Forest Maze treasures are hidden underground. When you come to an area with seven tree stumps, enter the first one on the right. The chest is toward the bottom of the room, where the floor juts out. See the image above for the exact location.
Forest Maze Hidden Treasure #4
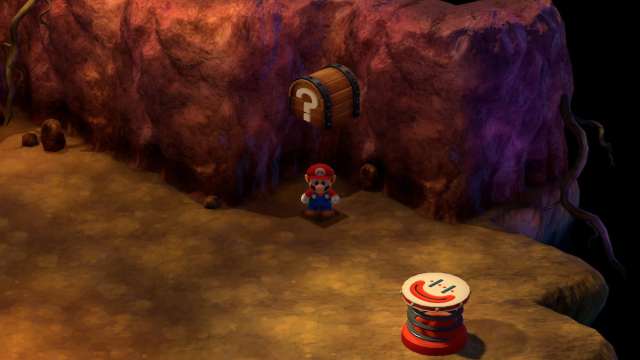
Go back to the area with seven tree stumps. Enter the left stump in the second row and jump up in the corner above the trampoline. This chest is a trick, though. It simply says “Bad Luck,” and you get nothing, but it still counts toward the total treasures you find.
Forest Maze Hidden Treasure #5
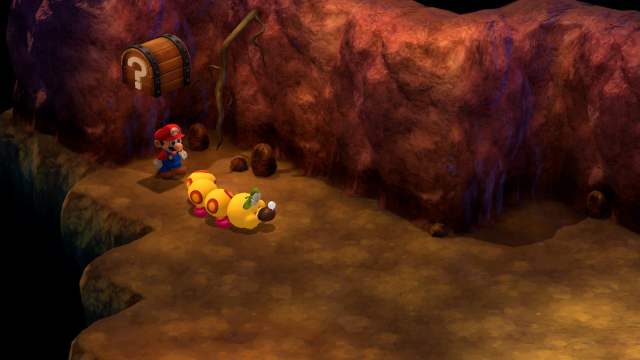
Go back to the seven stumps and enter the lone one at the end. Jump behind the sleeping Wiggler in this room. Hop up again to reveal this chest and receive a Croaka Cola.
Forest Maze Hidden Treasure #6
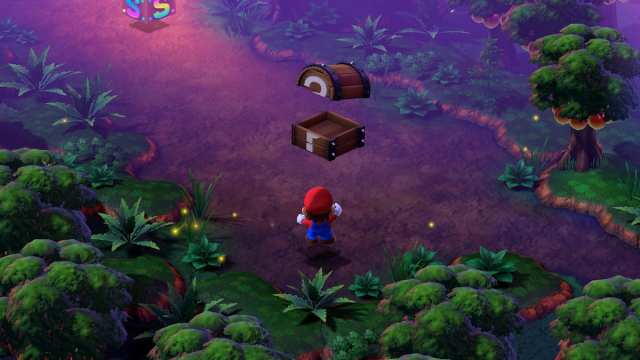
The final treasure is located in the last room with the save block. At the entrance, jump up at the bottom corner. This chest grants you a Red Essence.
Pipe Vault Hidden Treasure Locations
- Number of Treasures: Two
- Rewards: Two Frog Coins
Pipe Vault Hidden Treasures #1 and #2
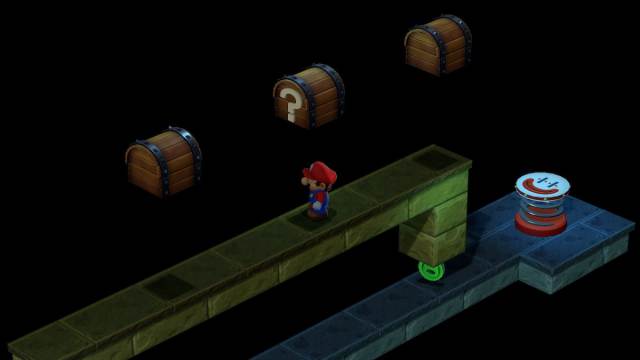
These treasures share a room. First, enter the second pipe in the Piranha Plants room. Stand in front of the raised platform and jump up, revealing a yellow block. Use that to get to the top. Walk to the second line on the ground and jump up to reveal the first treasure. Go a little past it to reveal the second one.
Yo’ster Isle Hidden Treasure Location
- Number of Treasures: One
- Rewards: Frog Coin
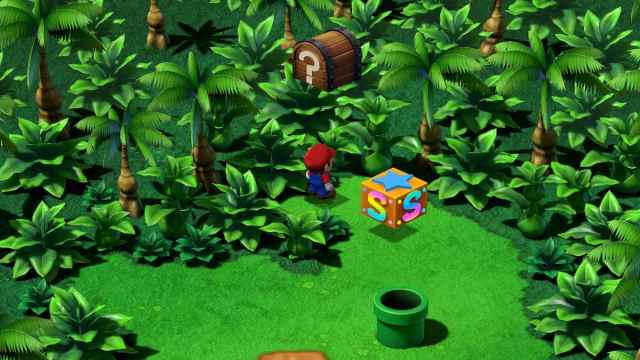
Home to our beloved Big Yoshi and Mushroom Derby, Yo’ster Isle also contains one easy-to-find treasure chest. You’ll arrive at the island entrance after you emerge from the Pipe Vault. Jump behind the save block to unveil this chest that contains a Frog Coin.
Booster Pass Hidden Treasure Locations
- Number of Treasures: Two
- Rewards: Flower and Rock Candy
Booster Pass Hidden Treasure #1
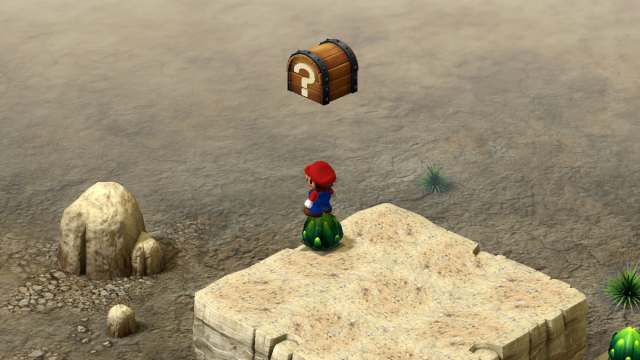
When you enter Booster Pass, go to the far left, where you’ll see a platform with one green bush. Jump onto the bush, then jump again to reveal the hidden treasure chest, giving you a Flower.
Booster Pass Hidden Treasure #2
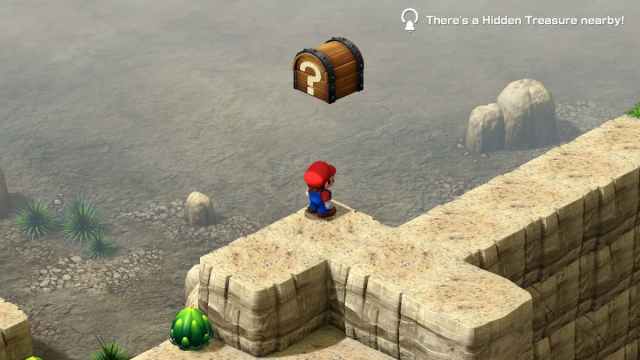
In the same area, you’ll hop up a few levels of land until you reach a straight path to the exit. However, before you leave, jump up in the left corner to reveal a chest holding a Rock Candy.
Booster Tower Hidden Treasure Locations
- Number of Treasures: Five
- Rewards: 3 Frog Coin, Goodie Bag, Mushroom
Booster Tower Hidden Treasure #1
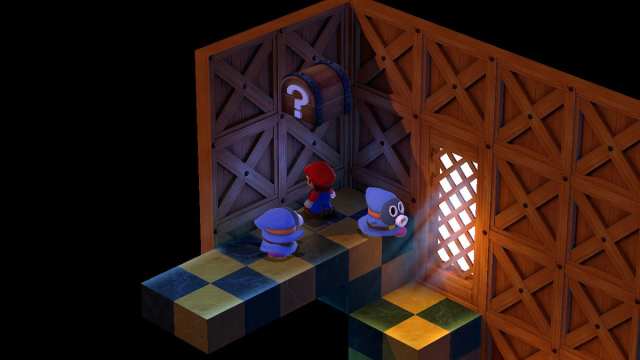
I found these Booster Tower treasures difficult with all the mobs around, but if you’re careful, you can evade them. This first treasure happens to be in a room with several Snifits running down the stairs. At the top, jump in the corner behind them. This yields a Frog Coin.
Booster Tower Hidden Treasure #2
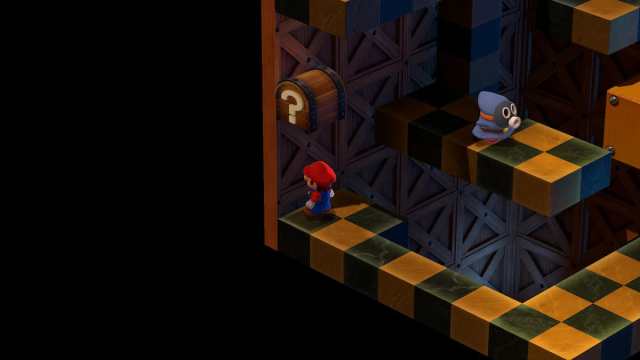
After a Thwomp boosts you to room with platforms and Snifits, head down the left path to the corner and jump up to reveal this treasure with a Frog Coin.
Booster Tower Hidden Treasure #3
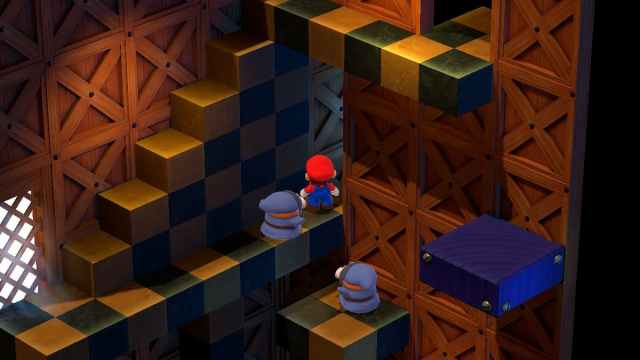
This technically isn’t an invisible chest, but it’s still a hidden item. In the same room with the Snifits, jump up the platforms. Before heading up the stairs, enter a side corridor and jump to get a Frog Coin.
Booster Tower Hidden Treasure #4
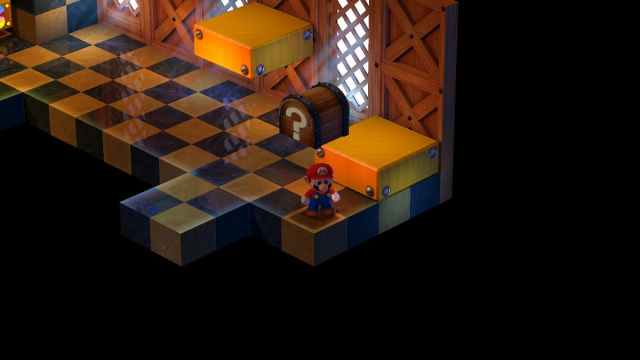
In the room with the save block, jump right next to the first yellow platform. You’ll reveal a chest with a Mushroom.
Booster Tower Hidden Treasure #5

Climb the yellow platforms and jump onto the visible chest. Then, jump again to get the hidden treasure. You’ll receive a Goodie Bag, a unique item full of coins.
Marrymore Hidden Treasure Location
- Number of Treasures: One
- Rewards: Frog Coin
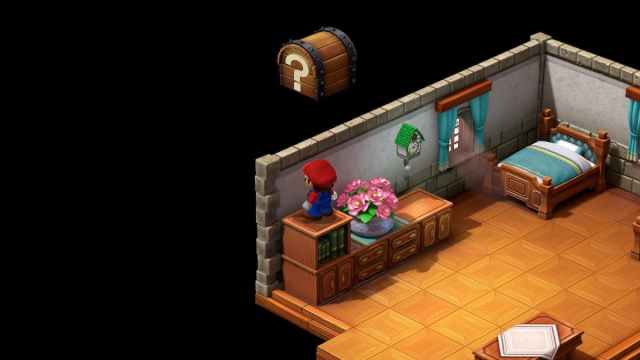
Go to the Marrymore Hotel and item shop. Then, head up the stairs and enter the first room on the next floor. Inside the room, jump on the furniture to your left to get this chest and its Frog Coin.
Sunken Ship Hidden Treasure Location
- Number of Treasures: One
- Rewards: Croaka Cola
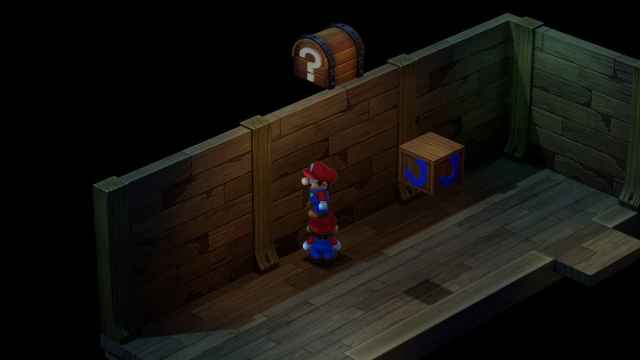
Out of all the hidden treasures in Super Mario RPG, this one gave me the most grief. You’ll come to a room with a Mario clone, but don’t talk to it. I instantly ran up to interact with it, which triggered a fight. Afterwards, I hit the block to reveal the chest, realizing I couldn’t reach it. You need to jump onto the other Mario to get the chest, which yields a Croaka Cola. But if you fight it first, the clone won’t be there. Moral of the story: reward first, XP later.
Land’s End Hidden Treasure Locations
- Number of Treasures: Four
- Rewards: Two Frog Coins, Croaka Cola, Red Essence
Land’s End Hidden Treasure #1
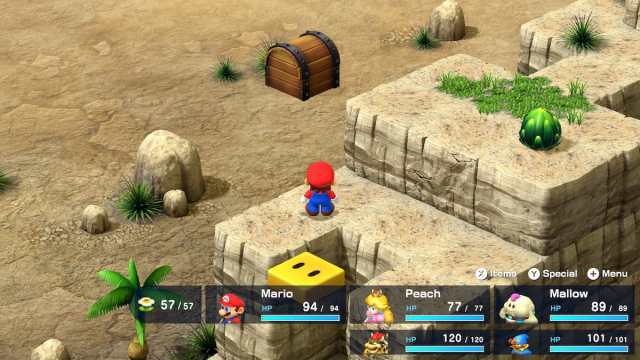
Land’s End treasures require precise jumps. To get the first one, use the cannon to reach the raised level, then jump onto the yellow platform. As pictured above, jump north off the platform to get this chest. It’s tricky to line up, but I found that facing the top left corner of the yellow block helped.
Land’s End Hidden Treasure #2
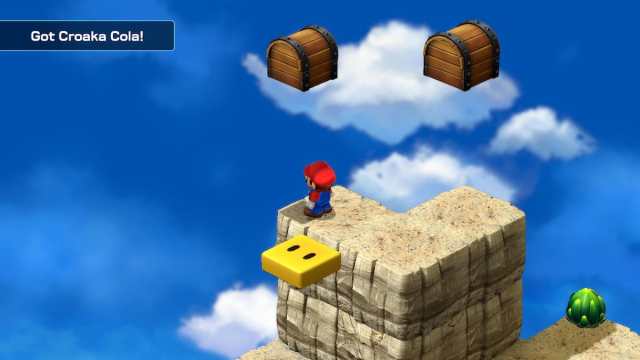
You’ll arrive at another cannon in the second area. I hopped right into it, and it launched me into a ditch, which aggroed a mob of Chows. You can avoid this by jumping into the lower area first and jumping up to reveal a yellow platform.
Use the cannon to launch onto the platform. After you land, jump to the space in front of the ditch and jump again. This will reveal a second platform. Go back to the cannon, and launch yourself all the way forward. Instead of falling into the Chow-riddled ditch, you’ll reach the treasure pictured above. This chest gives you a Croaka Cola.
Land’s End Hidden Treasure #3
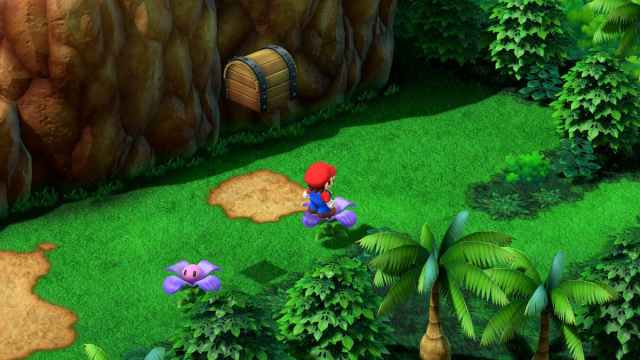
When you come to an area with a save block and several Stingers flying around, head to the right to an area with purple flowers. Jump off one of the flowers to reveal a hidden treasure chest between them. You’ll receive a Frog Coin.
Land’s End Hidden Treasure #4
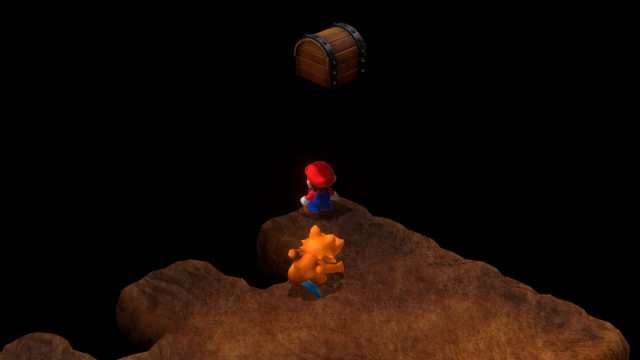
If you’re on your way to access the Kero Sewers Secret Chest, you’ll want to grab this hidden one along the way. Enter the cave just below the Sky Bridge and head to the area with the Chow. At the far back, jump up in the corner to reveal this chest with a Frog Coin.
Belome’s Temple Hidden Treasure Locations
- Number of Treasures: Two
- Rewards: Two Frog Coins
Belome’s Temple Hidden Treasure #1
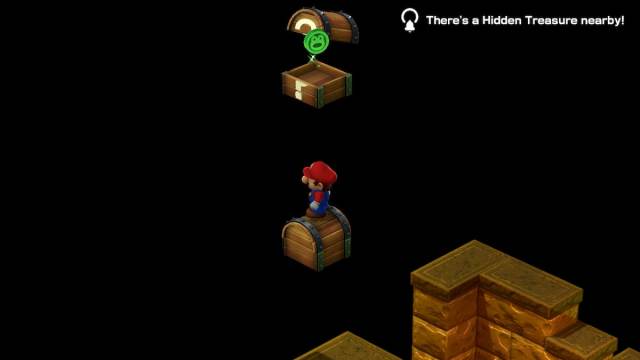
After getting your fortune, grab your prize and head through the gate. You’ll come to an area with a visible chest. You know the drill. Jump on top and again to reveal the chest holding a Frog Coin.
Belome’s Temple Hidden Treasure #2
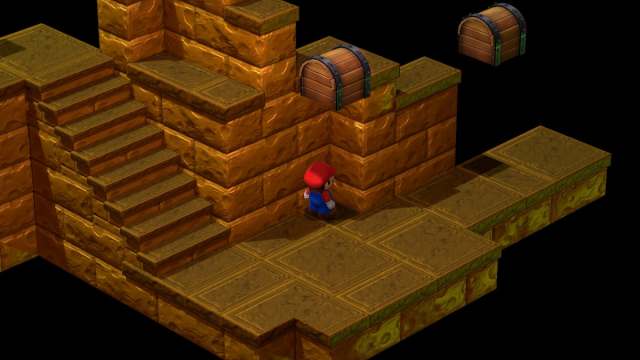
In the same room, go down the stairs and jump in the corner to reveal another hidden treasure with a second Frog Coin.
Monstro Town Hidden Treasure Location
- Number of Treasures: One
- Rewards: Frog Coin
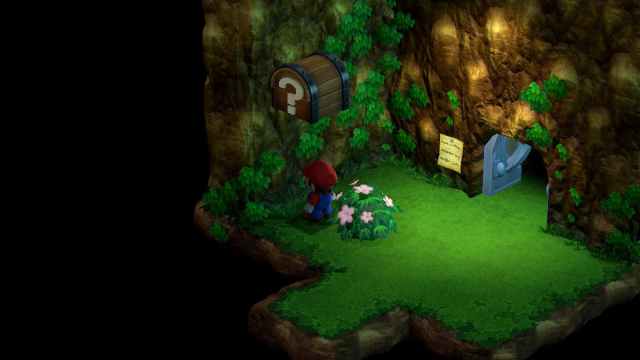
Once you arrive in Monstro Town, enter the last door. In the small room, jump next to the bush to reveal the treasure holding a Frog Coin.
Bean Valley Hidden Treasure Locations
- Number of Treasures: Three
- Rewards: Red Essence, Croaka Cola, Frog Coin
Bean Valley Hidden Treasure #1
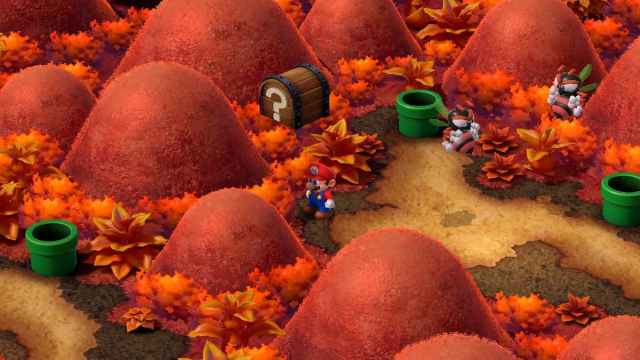
There are pipes aplenty in Bean Valley. From the entrance, use the right pipe to travel to an area with more pipes and Stingers. Jump up in the area pictured above to unveil a chest and a Frog Coin.
Bean Valley Hidden Treasure #2
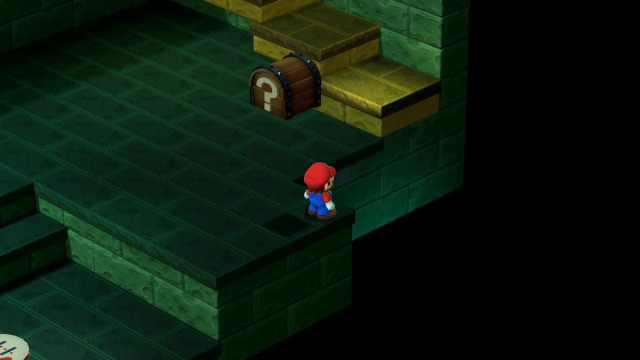
Like the Forest Maze, you’ll arrive in an area with five Piranha Plants in pipes. Wait for the Shy Guy to water them, and defeat the one in the pipe to the right. With the path clear, go down to an underground area. Jump in the spot near the yellow stairs (pictured above) to unveil a chest with Red Essence. There’s another visible chest here, too, but be ready for a tough surprise if you hit it.
Bean Valley Hidden Treasure #3
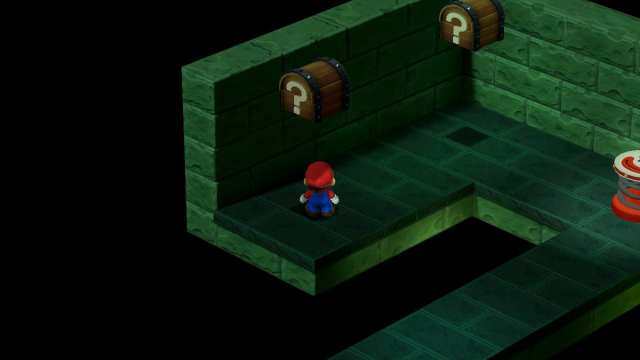
The process is the same for the last treasure. This one is located in the pipe closest to the entrance, right below the pipe for Treasure #2. Go down it and follow the path until you reach the empty corner. Jump up to reveal the treasure, yielding a Croaka Cola.
Nimbus Land Hidden Treasure Locations
- Number of Treasures: Five
- Rewards: Five Frog Coins
Nimbus Land Hidden Treasure #1
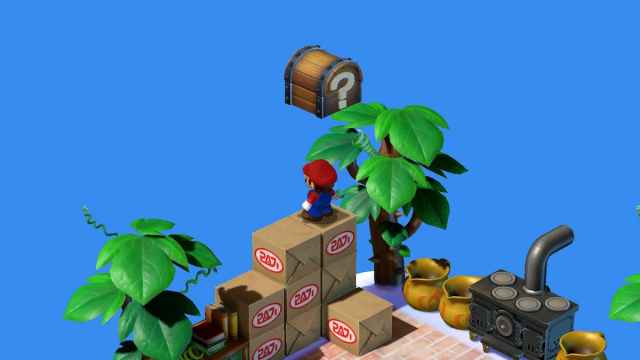
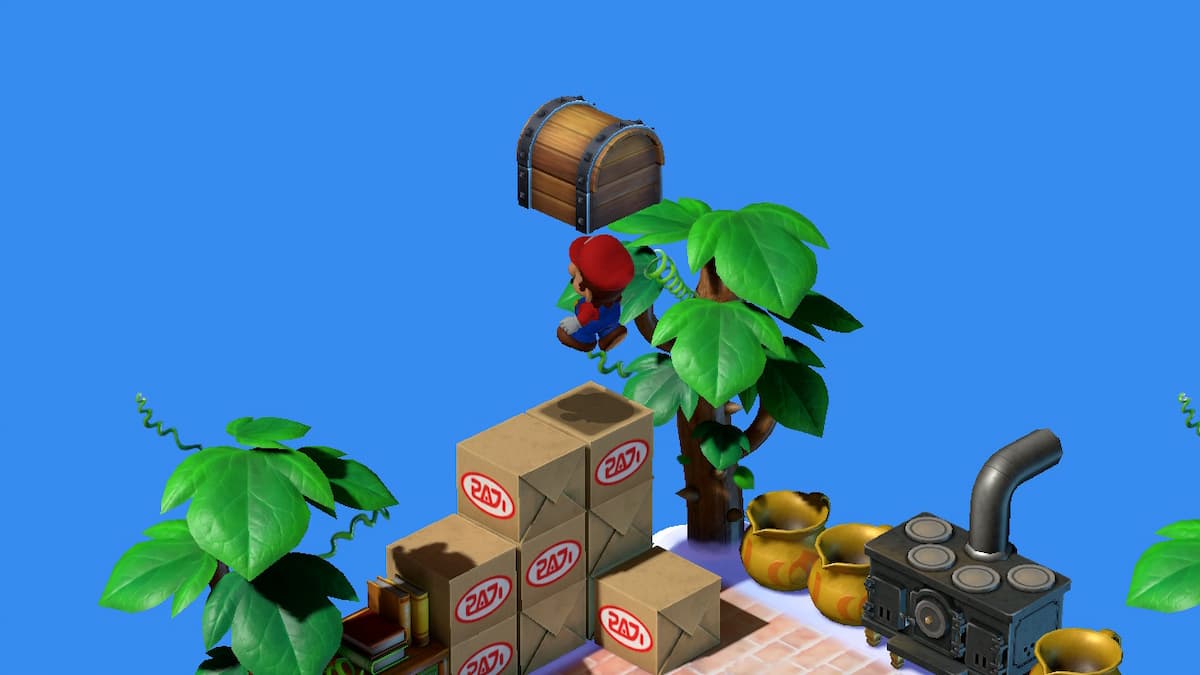
Inside the Nimbus Land item shop, jump up on the boxes behind the vendor. This treasure offers a Frog Coin.
Nimbus Land Hidden Treasure #2 and #3
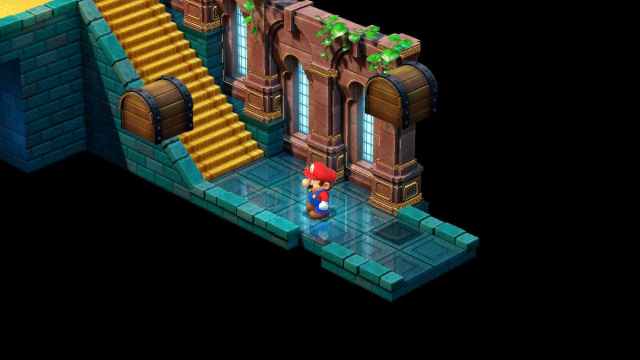
In Nimbus Castle, head to the room with three doors, and enter the one on the far left side. Proceed until you come to a set of stairs and a Jawful. Defeat the enemies, then jump up in the same spot where the Jawful was located. This will reveal a chest with a Frog Coin inside. In the same room, head to the gap in the floor where the Jawful was pointing his fork. Walk off the visible ground and jump up to find another chest containing a Frog Coin.
Nimbus Land Hidden Treasure #4
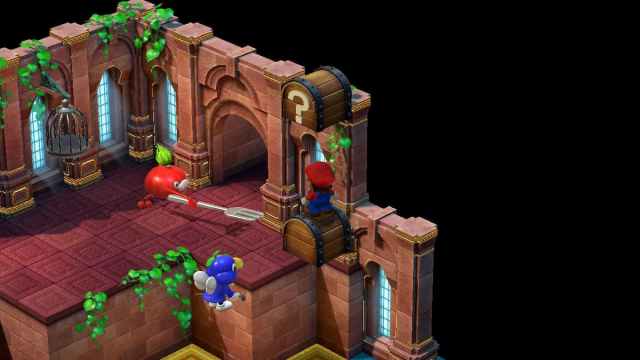
After you get the Castle Key 2, you’ll come to a room with a Pinwheel and other enemies. Defeat the Pinwheel first. Otherwise, it’ll blow you off the edge like it did to me. With the path clear, walk over to the ledge facing a visible chest. Hop onto the chest and jump to unveil another hidden chest with a Frog Coin.
Nimbus Land Hidden Treasure #5
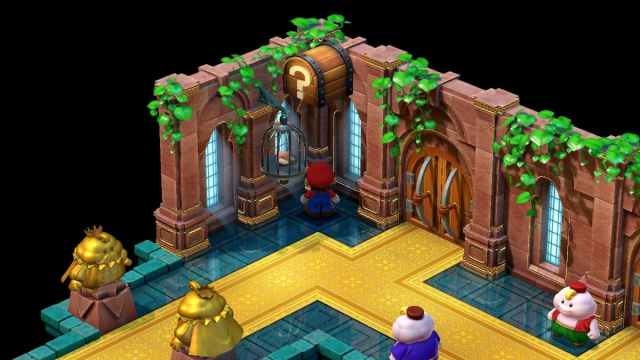
I thought I had gotten all of the Nimbus Land treasures, but it turns out there’s one more. Once you return the castle to its rightful rulers, you’ll head through the three-door room again on your way out. This time the Signal Ring will ping for a hidden treasure that wasn’t there before. Jump in the corner near the bird cage to reveal this new (and last) treasure for the area.
Weapon World Hidden Treasure Location
- Number of Treasures: One
- Rewards: Mushroom
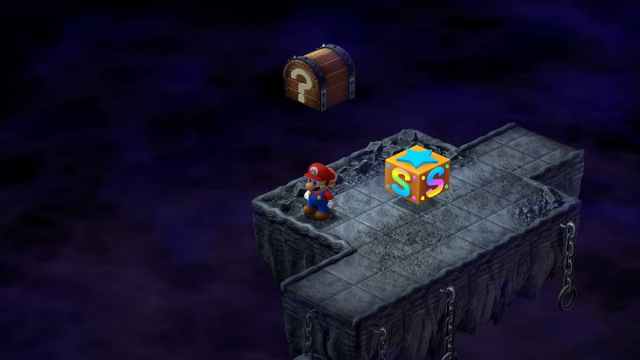
The final hidden treasure chest is in a location only accessible after defeating Exor. When you get sucked into Weapon World, you’ll come to a room with a save block. Jump behind it to reveal the last invisible chest, which grants you a… Mushroom.
That’s all hidden treasure locations in Super Mario RPG. By now, you must have a ton of Frog Coins under your belt, but if you’re looking for more, check out our guide on how to farm them. For more tips, such as how to unlock a secret boss and how to get the Super Suit, jump over to our dedicated SMRPG guides hub.




Published: Nov 21, 2023 09:23 am