
Wild Bastards is a game where your strategy for each encounter alongside the characters you send down for them can make all the difference between a victory or a loss. If you know how to deal with certain pesky enemies, you’re much more likely to succeed. Here’s a full breakdown of all enemies in Wild Bastards and how to effectively counter and beat them.
All Enemies in Wild Bastards and How to Beat Them
There are a total of 42 different enemies in Wild Bastards separated into three different Categories. We’ll go over each enemy and how to beat them.
All Chasteners
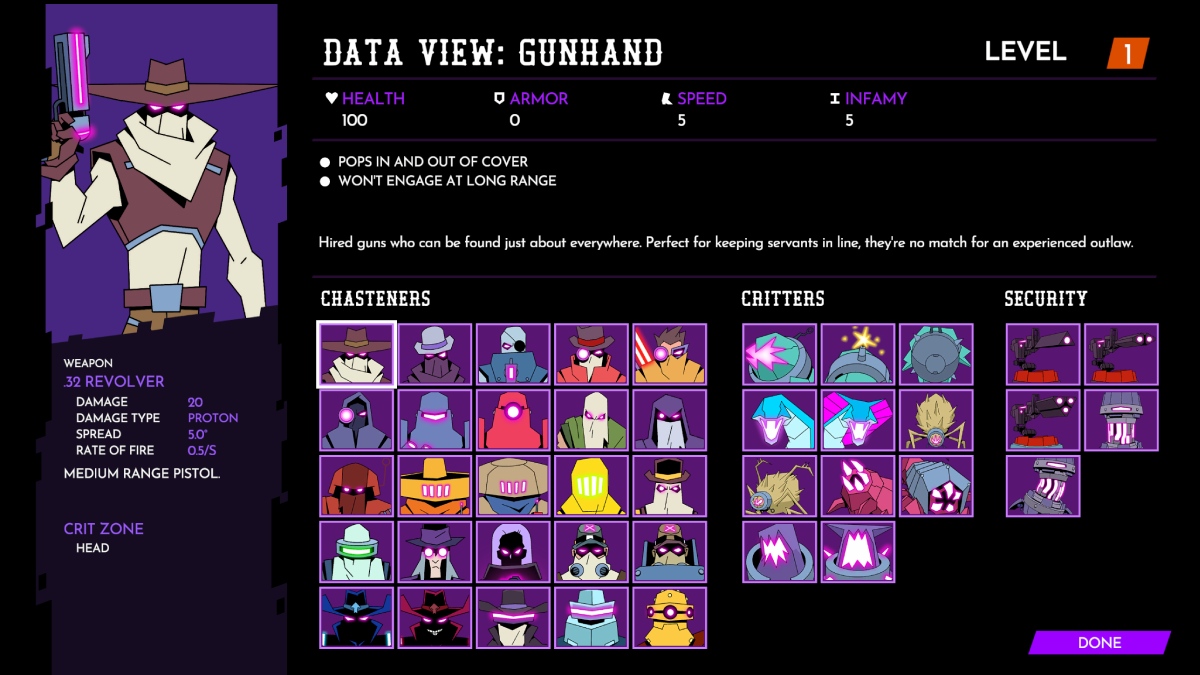
Chasteners are the humanoid enemies under Chaste’s employment that you’ll encounter on most planets. We’re assigning their difficulties to Low, Moderate, Dangerous, Very Dangerous, and Extremely Dangerous.
| Chastener | Threat Level | How to Beat |
|---|---|---|
| Gunhand | Moderate | Can be easily dealt with by any character. They duck in and out of cover. |
| Trained Gunhand | Moderate | They just have 100 more HP than the regular Gunhand. |
| Veteran Gunhand | Dangerous | Armor, High Health, and High damage make these foes very Dangerous. |
| Hunter | Low | Low HP and low Rate of Fire, easy to deal with using any ranged character. |
| Killer Hunter | Moderate | More dangerous than regular hunters due to the higher rate of fire. Use cover. |
| Stealthy Hunter | Dangerous | Extremely dangerous at a distance. Use Judge to contest at a range, or close the distance using cover. |
| Ironclad | Dangerous | A powerful close-range juggernaut with high damage. Keep running away from them as they can’t fire until they’re close to you. Run away while damaging them. |
| Rocket Ironclad | Very Dangerous | Very dangerous enemies that need to be dealt with immediately from a distance. 1000 HP, 10 Armor, and high range rockets. Use Stunts to deal with them or avoid if possible. |
| Bushwacker | Low | These enemies will hide and pop out for an ambush when you’re nearby. Easy to react to and dispatch. |
| Furtive Bushwacker | Dangerous | Use similar flanking tactics and hide waiting for you. Deal with them from afar or through Stunts. |
| Ambushing Bushwacker | Very Dangerous | Failure to detect them can instantly get you killed. If they’re in the encounter, make sure to locate them first using characters like Sarge, or keep your distance using characters like Judge. |
| Blaster | Low | With prominent colors, low HP, and a slow grenade toss, these enemies are easy to handle. |
| Cluster Blaster | Moderate | Remain on the move and don’t hesitate to close the distance. Detect them through their camouflage cloaks by noticing where the dynamite is tossed from. |
| Atomic Blaster | Dangerous | Not too hard to deal with but their blasts leave lingering radioactive zones that can serve as chokepoints. Deal with them before entering any closed spaces. |
| Yellowbelly | Very Dangerous | Enemies with a 180-degree shield and very fast attacks that pierce armor. Flank them or ideally use Kaboom and Rawhide to bypass their shields. |
| Forted Yellowbelly | Extremely Dangerous | Extremely tough enemies to deal with and will often spawn in groups of many. Your best bet is to use Rawhide or rely on characters with powerful Stunts that bypass shields. |
| Mortician | Moderate | Stays in a single spot and launches homing orbs that explode towards you. Track the source of the orbs to deal with them quickly. You can shoot the orbs to destroy them. |
| Multiplying Mortician | Dangerous | Orbs multiply when they are destroyed. Prioritize tracking these enemies near the start of the map or climb up to a location where the orbs cannot follow you. |
| Cranker | Moderate | Machine gun that ramps up once they’re close enough with a line of sight. Take advantage of their slow movement and low range to punish them using characters like Judge and Smoky. |
| Heavy Cranker | Dangerous | Machine gun that ramps up once they’re close enough with a line of sight. Take advantage of their slow movement and low range to punish characters like Judge and Smoky. |
| Assassin | Dangerous | Use characters with good range like Spider Rosa or Judge. Billy the Squid can make quick work of them. They teleport close to where they disappear from, so attack them immediately. |
| Regenerating Assassin | Very Dangerous | Billy the Squid can make quick work of them. Don’t ignore them after damaging them as they will regenerate. Focus on bursting them down in one go. |
| McNeill | Dangerous | Check our guide on how to beat the Three Princes. |
| Fransisco | Very Dangerous | Check our guide on how to beat the Three Princes. |
| Barrabas | Extremely Dangerous | Check our guide on how to beat the Three Princes. |
All Critters
Critters are the corrupted animals and animalistic enemies you encounter on each planet. They usually roam in packs. The best way to deal with all Critters is to make use of Rawhide’s Stunt and passive that let you subvert them to your side.
| Critters | Threat Level | How to Beat |
|---|---|---|
| Kyote | Low | Simple enemies that spawn in many packs, chase you and use a laser when nearby. Stay at a distance to avoid letting them attack. |
| Unstable Kyote | Low | Same as Kyotes, but they launch an explosive on death. You can use their explosions to kill other nearby enemies and Kyotes. Try to prioritize killing them near enemy groups. |
| Armored Kyote | Dangerous | Can prove to be very dangerous in packs of many. Stay on the run while damaging them from afar. Don’t let them close the gap. Their armor makes them tough to quickly kill, you’ll need high rates of fire. |
| Rattler | Dangerous | A very annoying Critter that goes in and out of hiding, with a small hitbox and poisons you when it lands an attack. Use Judge, Rosa, and Billy to accurately take them down or use AoE attack tactics with Kaboom and Smokey. |
| Venomous Rattler | Dangerous | Even more dangerous version of the Rattler, be extra cautious as they can spawn in the water as well. Swap out Outlaw when poisoned. |
| Porcupine | Dangerous | A dangerous enemy that retaliates with homing spikes when attacked. The best way to deal with them is using Rawhide or by landing Crits with accurate characters like Judge to disable spikes. |
| Vengeful Porcupine | Dangerous | Land Crits with Judge or use characters like Sarge that can block retaliatory damage. |
| Stinger | Low | Easy to deal with critters that spew venom. The hardest part is to spot them without getting too close. Be careful and use cover. |
| Inescapable Stinger | Dangerous | Stay at a distance and damage them from afar. They will use rockets when you’re in the line of sight so utilize cover. |
| Grizzly | Dangerous | Stay at a distance and damage them from afar. They will use rockets when you’re in line of sight so utilize cover. |
| Irritable Grizzly | Very Dangerous | Enraged when hurt, you’ll need a lot of cover to avoid their explosive shots. Very powerful attacks, so don’t take risks. Try to land headshots from afar. |
All Security
Lastly, security is the various turrets and machines that you can run into on each map. While dangerous, you’re not required to destroy all of these to clear a stage, they’re just additonal lines of defense.
| Security | Threat Level |
|---|---|
| Gunbarrel | Moderate |
| Repeating Gunbarrel | Moderate |
| Plated Gunbarrel | Dangerous. Armored. |
| Jackbox | Dangerous. Invulnerable till opened. |
| Mobile Jackbox | Very Dangerous. Invulnerable till opened and actively pursues you. |
If you want to beat Security, you need to destroy suspicious Grey Barrels from a distance or use characters like Sarge who can identify them. Spike can hack security barrels and some nodes allow you to disable Security for an entire turn.
That covers all the enemies and enemy types in Wild Bastards along with useful tips and strategies on how to beat them all. For more guides, check out all Wild Bastard characters and learn how long it takes to beat the game.


Published: Sep 12, 2024 03:00 am